Sunday 29 December 2013

A Christmas catch up.


I hope you had a merry little Christmas!

I myself had a rather pretty little Christmas, with fairy lights strung about the place, the smell of mulled cider drifting through the air and 'White Christmas' playing its way through the house.

As for presents, a factor of Christmas that has always been the cause of a fair amount of excitement, I asked for some new dressmaking scissors (lovely and sharp, that actually cut through the fabric!). I also got a book on historical corset patterns, by Jill Salen.


My great great grandmother received a singer sewing machine for her 18th birthday in around 1900, it was then well used by every generation until it reached me. I remember my mum using it to make pillows for my barbies, and things like that. Once we got an electric sewing machine, it got put under the stairs and has been there ever since. Recently, I've been meaning to get it out and have a look, but just haven't got round to it.
It's that typical combination of remembering to do something when you have the time to do it!
Anyway, Boxing day (I think it was), I finally pulled it out of it's hiding place, lifted off the lovely cover...


And found the well loved sewing machine, along with its original instructions, and a box of various tools.


It all works, but it does need a bit of a clean up.

Being a sucker for old packaging, the box that holds the various tools and bits and bobs, I found almost as exciting as the original instructions, or the machine itself! Almost. 
It looks to be an old shoe polish box, and on the inside of the lid are instructions on how one would go about using 'Black Nugget Polish'.


It reads, "Kindly use SMALLEST quantity of the Polish with corner of a clean Brush - really, only a smear is required - brush it well into the Leather with the whole of the Brush, and after getting a polish, finish off the a Pad." 

How polite.


Well, it's nice to be back on the blogging scene after having accidentally taken the summer and the autumn off, ahem. 

I wish you a Happy New Year!


Saturday 28 December 2013

I am still here, promise.

I was originally going to say that I took the summer off blogging, but then it turned out to be the autumn, too. My excuse?

I've been busy.

That's it, I'm afraid.

But, I've been busy with interesting things! More posts to come, but here's a few sneak previews.


Tuesday 18 June 2013

Fox cushion cover.

So the other day, I was in a very creative mood, and almost couldn't stop. (or rather, I didn't want to)

One thing I came out with, was this fox cushion cover -


Sweet, is it not? I came across this tutorial from A Beautiful Mess, and had to give it a go. I didn't have enough stuffing to make a 'plush doll', so I decided to adapt it to make a cushion cover - which did mean it ended up square, and not as fox looking as the ones pictured in the tutorial, but hey ho!


I measured around the cushion, added a couple of inches to be safe, with one inch seam allowance, and drew a square on the main fabric. Added the ears, and cut it out. I then cut about a third from the bottom of one of the pieces, that then became the back, and filled the gap with the contrasting fabric.


Stitched on a triangle of contrasting fabric, a circle of patterned, three buttons - one for the nose, two for the eyes - and I was ready to start constructing the cushion cover!


I hemmed the two back pieces, I thought having the hem on the outside added a bit of detail.I then laid one just over the other, pinned them to the front piece, making sure to keep the right sides together so I could turn it the right way around. Stitched it all up, clipped the corners, turned it inside out and voila! All I then had to do was sew a button and a bit of cord on the back to keep it closed, and I was done. 


Making cushion covers can be really simple, but you can make them so interesting just by adding a few scraps of fabric, or changing the shape, or even covering them with sequins. This only took me a few hours and a bit of improvisation, but the world is your oyster when it comes to cushion covers.

Saturday 27 April 2013

Patch pocket skirt.


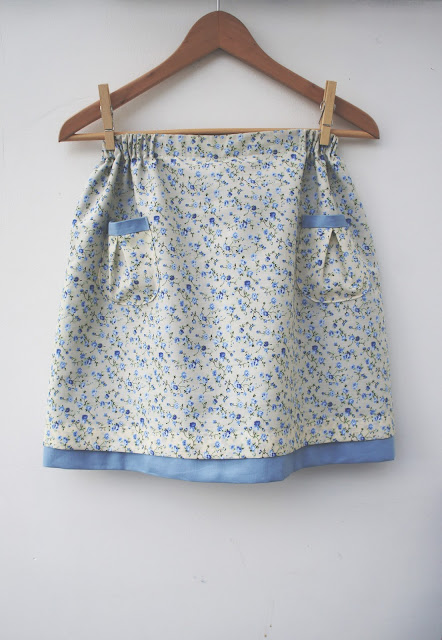
My sister has been asking me to make her a skirt for ages; she even went so far as to send me an email entitled 'Pleeeaase' and attached was a link with a quick tutorial for one. So with that link and some basic alterations in mind, I set to work, and was done in a day. This is what I came up with! Along with a little info on how I went about it...

This is my first lined skirt, as well as my first attempt at patch pockets. Not bad, if I do say so myself! And I do love the fabric... Anyway.

So, I started with two rectangles of fabric - the patterned and the lining - long enough to allow for the hem and the bit for the elastic to go through, I wasn't so fussed about the width as the elastic would see to that.

I folded the top of the patterned fabric down twice, making sure to leave enough room for the elastic to pass through, and sort of stuck the lining fabric underneath the fold, and then stitched along. You can kind of see it in this photo -


Now, I was kind of making this up as I went along, so it was at this point I thread the elastic through, just to see how it looked, and to decide where the pockets should go, as my sister decided she wanted some! The pockets are just two rough semi circles pleated in the middle and sewn, at the top, to a strip of the lining fabric.


I sewed the pockets on, then folded the skirt right sides together and stitched only the elastic, as I wanted to finish off the lining as best as I could. Then I sewed up the lining and the outer skirt separately. However, I didn't like just having the top of the seam on show (raw edges, no thank you) so I covered it up like so -


By simply hand stitching a little piece of the lining fabric over the top.

I sewed the hem by machine -


And got my sister to try it on. It didn't quite look the right shape, it was too poofy at the front. Easily fixed by pulling gently on the fabric at the waistband at the front until it was pulled straight, and then add a row or two of stitches either side. You can more or less see what I mean in this photo -


And that's basically it! Obviously the end result would differ should I make another one with a heavier fabric, or thinner elastic, all that jazz. But I shall get experimenting, and shall have a go at making one for myself! I really should get to make more everyday clothes, because as much as a medieval dress may come in handy, ahem, it's not incredibly practical. I mean, have you seen those sleeves? But yes, summer 2013 wardrobe, here I come!


Thursday 4 April 2013

"To Joan, from Marie. Oct 27th 1915"


I found this pretty little edition of Jane Eyre by Charlotte Bronte, from 1914 I think, in a charity shop a few weeks back and have only now remembered I took a few photos, so I thought you might like to see.


I certainly have a thing for old books, especially the classics that are still published today, as fascinating as out of print books may be. I mean, it just shows that a good story really can withstand time.

So, I spotted this one thanks to it's gorgeous spine, picked it from the shelf, opened it up, and look -


A personal message reading "To Joan, from Marie. Oct 27th 1915"

Safe to say, I needed no further encouragement to make a purchase.

It was when I was having a quick look through later that day that I discovered the back pages to be a 'List of the series' including prices! Yeah, I'm a bit of a sucker for that too.


I have bought so many books lately, but haven't been reading much due to a sudden increase in my musical soundtracks library, ahem, so my 'to read' list is more of a who's who of literature at present, which is something I intend to take care of!

Friday 1 March 2013

The Medieval Dress.

I have always wanted a medieval dress. You know, big flowing sleeves, a swishy skirt, lacing...

So I decided to make one.

It was really when I went to see The Hobbit - good film - a couple of months ago, that I made my mind up to simply go for it. So I pulled together a few ideas I'd had floating around my head for a good few years, jotted them down, then got right to it.

The overall dress consists of two garments - a kirtle and an overdress. The kirtle (that looks like a chemise) is made from a single bedsheet, while the overdress is made from a kingsized duvet cover and pillow set that I found at a charity shop (for £4.99, no less). Let's just say it took me a little while to unpick everything.

I never actually planned to make it out of bedding, that's just how it ended up!

Anyway, without further ado, here it is! I shall explain more as we go along. (you'll have to excuse the creases...)


The dress in its entirety.


The kirtle (see what I mean about the chemise).

The kirtle, I literally made it up as I went along. It's made up of a front piece and a back piece (both the same shape), four panels and two sleeves, with a drawstring neckline and lacing up the forearm of the sleeve to achieve a tight fit.


Drawstring neckline.


Sleeves and lacing, using button holes instead of eyelets.


Construction detailing - underside of the sleeve seam, followed by the side seam, followed by the start of the triangular shaped panels, of which there are two on each side.

Now for the dress, I needed to start somewhere, and so I was scouring the internet for free medieval dress patterns and came across this website that had a good few patterns and ideas, and not exclusively for medieval wedding dresses as the title may suggest. But this is the pattern that my dress is loosely based on...

What I then did, with that pattern in my head, was use the top half of a modern dress pattern I already had (new look 6095) so that I had the general shape of the top half, and I could then also add bust darts. 
I cut the panels from the pillow cases, five panels in total, and everything else from the duvet cover, and I still have plenty of leftover material! 

The sleeves, I drafted myself. I then sewed everything together, and set to work on the button holes for the lacing.

How many button holes are there in total, do I hear you ask?

80. 24 on the kirtle, 56 on the overdress.

Yeah, those were a little time consuming.


But the result is reward enough! I've always loved lacing, it's practical and it looks pretty, what more could you want?

Both the neckline and sleeves are edged with bias binding. 


The neckline at the back.


The inside of a sleeve.

What I may do at some point is trim the dress with some velvet, or embroidered ribbon, for added detail, but it doesn't look too bad just as it is.


This photo shows the finish of the fabric off quite nicely. Having this finish, meant that due to the panels being cut differently, they look like a different colour to the main body of the dress, and I really rather liked that effect.

With this being my first go at making a historical costume, and having made most of it up as I went along, I'm pretty pleased with how it came out.

Of course, at some point, I'll take some photos of it on myself - then I can properly show off the sleeves - but for now you'll have to do with my trusty, as of yet nameless, dressmakers dummy posing as model.


Wednesday 30 January 2013

Hollywood Costume Exhibition at the V&A.


Look where I went at the weekend!

It was so good.

I'm so glad I managed to catch it in it's last few days, as I would have been sorry to miss it.

The collection of costumes - both old and new, and over 100 - was just amazing. It was really interesting seeing the progression of costume design through the years...the historical getting more historically accurate, while ever more thought goes into the modern and the types of characters wearing the costumes. By some of the costumes, they had snippets of the script, by others they had quotes from both the actors wearing the costumes and the designers, which added to the intake of information.

Now, onto the costumes themselves.

I wouldn't be able to pick a favourite, though I did love seeing the costumes from the films I grew up watching, the classics, and being so familiar with the costumes themselves, actually seeing them right in front of you was quite special. The amount of detailing on some of the historical costumes that you barely notice when on film... It also shows you how much of a part costume design plays in the making of the film, in making it believable. The audience has to believe the characters had a life before you see them on screen, else it just wouldn't work. It's all those little things that really go into costume design and make a film, a story, work.

There was something for everyone, from Indiana Jones to Eliza Doolittle, from Charlie Chaplin to Elizabeth I. While you weren't able to take pictures of the actual exhibition, here are a few images of some of the costumes on film, that I have seen, in person, ehehe...


Marilyn Monroe, The Seven Year Itch, 1955.


Judy Garland, The Wizard of Oz, 1939.


Keira Knightley, Atonement, 2007.


Audrey Hepburn, Breakfast at Tiffany's, 1961.


Audrey Hepburn, My Fair Lady, 1964.


Kate Winslet, Titanic, 1997.


Charlie Chaplin, The Circus, 1928.


Cate Blancett, Elizabeth, 1998.


Meryl Streep, A Series of Unfortunate Events, 2004.


Darth Vader, Star Wars V: The Empire Strikes Back, 1980.

So, as you can see, a real selection of costumes, and that's only a small portion of what was there...

I'm so happy I managed to catch it in it's last few days, I really did love it, what an opportunity to see some of the most iconic costumes of all time, and learn a few things along the way!


Sunday 20 January 2013

Les Miserables: The costumes, and the fashion of the day.

So I just got back from seeing Les Miserables and, oh, is it good. (edit: I went to see it a grand total of 6 times and am now, more or less, obsessed.)

This is coming from someone who, despite being a great fan of musical theatre, has never actually been to see a West End production! I wasn't particularly familiar with the story, having not read the book either. I was familiar somewhat with the soundtrack - musical theatre soundtracks, another thing I just love - and the Les Mis soundtrack is brilliant. The way all the songs have a kind of connection, whether that's through the lyrics or the melody, which some people may find a bit annoying, not being able to tell songs apart, but when done well, it just works. And also how they were recorded live on set, allowing the actors the freedom to really act the songs, play with the tempo, it just gave it that extra something.

Now, costumes. Hehe.


- -


Costume designer, Paco Delgado

I found this link here that includes an interview with the costume designer Paco Delgado, which I will take a few snippets from that I found of great interest...

Costume designer Paco Delgado first met director Tom Hooper in Spain, and got along so well that a few months later he was invited to meet Hooper in London to discuss his next project - Les Miserables.
From the overall colour scheme to the revolutionary rosettes, nothing in Les Mis is an accident. For instance, the use of red, blue and white - the colours of the french flag - was a cue taken from period artworks.

Liberty Leading the People by Eugène Delacroix 


“You have for example Delacroix’s Freedom Guiding the People for the barricade and you see people blocked in solid blue, with red and with white. That was a decision — Tom wanted to go that way, and use these three colours in a very patriotic way. But then with Marius and Cosette, it was more natural, a question of a romantic story going on."

“When you start designing a movie, especially in a case like this one where you have so many characters you have to have a sort of leitmotif running for character,”

Jean Valjean -“It is very monastic, his life. And once, in Morocco, I saw shepherds in the Atlas mountains wearing these long coats made with very, very coarse wool from the sheep that they had."

Fantine - “One of the first things that Tom said to me is that he wanted that factory to look in fact a little bit like a nunnery. Like a convent of girls, where purity was there. Obviously blue is a colour associated with purity, and also associated with nuns and the Virgin Mary.”


Éponine - “I love see-through materials, always. I think they bring a fragility and you always can play with light with them. And also you always can play with different layers. And I love that."

Javert - “...we started with a bright blue. We then start darkening his costume because we thought his character was getting more deeply sorrowful, more sombre, more complex, in a way — obsessed with trying to catch a man who was almost uncatchable."

Cosette - “We always thought of Cosette like a flower ­ ­— the reason we used peaches and lilacs and all the colours you could see in a garden. She started as a girl dressed in black because she was living in a convent and had this sort of saint kind of look, a proper girl at a convent school.”

Marius - "He obviously is a rich guy who pretends he is poor and all those things had to be inside his costume somehow.”

I found the following really interesting, it's something you don't really think about when watching the film, but if the sound is recorded live then fabric becomes a consideration. It seems they were lucky with the time it's set...“We had to be very careful with the sound of the fabrics. We couldn’t use any taffeta at all because it makes so much noise. But by fortune, that wasn’t a period of taffeta. You have it at the end of the 18th century and then later on in the 19th century but in the period of the film, silk was something of the Ancien Régime, used at Versailles, and there was a big backlash and rejection of those expensive fabrics at the time. They had also discovered a new fabric from India: cotton. Chintz and cotton and muslin, it’s an amazing period for that. So you have a moment in history when cotton was considered much more beautiful than silk. We were very lucky about that!”

So yes, do have a quick look as they also have a few pictures and more information and such.

There's also a short costume design featurette on youtube, along with a hair and makeup one.

The story starts in 1815 and progresses through to 1832 (though I think the final scene in the film is in 1848), and fashions changed quite a bit in that period. By the 1800s, here in England we were still in the regency era, think Jane Austen, though fashions were becoming a little more fancy. Waistlines get lower as we got through the early 1800s (waistlines were up and down constantly throughout the 18th and 19th centuries), until they are right at the waist, as upposed to right under the bust, though the lower classes kept this high waist until about 1830.

Here is an example comparing female fashions in 1815 to 1830.

Waistlines changed, necklines changed, sleeves and skirts got bigger. Bodices became a 'V' shape and women started wearing corsets for a slim waist. You can see the Victorian look come into play as it's only a couple of years before Queen Victoria comes to the throne (1837).


Amanda Seyfried as Cosette

In France, it was pretty much the same story. Here's a good website that explores the fashions from about 1800-1825, and includes both France and England.

Men's fashions, I know a bit less about, but the most distinctive look in the film would be this sort of thing...


Eddie Redmayne as Marius

The Byron collar, a stiffened cravat and a waistcoat, or vest (single or double breasted), was a gentlemen's choice of attire in the 1820s - 1830s. Along with breeches, high waisted trousers and a choice of shoes or boots.

Fashions through the 1800s all used to merge into one for me, but the more I look, the more I notice how distinctive they are to their decade.


Hope you've found this interesting, I just love the progression of fashions and how they came about. Especially when it's included in awesome film adaptations of musical productions...